Introduction
This comprehensive guide walks you through installing and configuring SAP Commerce Cloud (Hybris) 2205 with the SAP Spartacus Angular storefront. You’ll learn how to set up the complete development environment, configure sample data, and resolve common installation issues.
Table of Contents
What You’ll Build
By the end of this tutorial, you will have:
- A fully functional SAP Hybris 2205 installation
- Spartacus Angular storefront running locally
- Configured OAuth authentication and CORS
- Multiple sample storefronts (Apparel UK, Electronics, Powertools)
- Access to SmartEdit and Backoffice
Estimated completion time: 60-90 minutes
Prerequisites
System Requirements
- Operating System: Windows 10/11 (64-bit)
- RAM: Minimum 16GB (32GB recommended)
- Disk Space: At least 15GB free space
- CPU: Multi-core processor recommended
Required Software Downloads
Before starting, download the following:
-
JDK 17
- Download: Oracle JDK 17 Archive
- Required for running SAP Commerce Cloud
-
SAP Hybris Suite 2205
- Primary source: SAP Software Center
- Alternative download: Mirror Link
-
Spartacus Sample Data
- Download: spartacussampledata.2105.zip
-
Custom Recipe
- Download: cx-for-spa Recipe
-
Node.js v14.20.0
- Download: Node.js v14.20.0
- Choose installer:
node-v14.20.0-x64.msi(for 64-bit Windows)
Part 1: SAP Hybris 2205 Installation
Step 1: Install JDK 17
- Download JDK 17 installer from the link above
- Run the installer and follow the installation wizard
- Accept default installation path or choose custom location
Verify Installation:
Open Command Prompt and run:
java -version
# Expected output: java version "17.0.x"
Set JAVA_HOME (if needed):
# Set environment variable
setx JAVA_HOME "C:\Program Files\Java\jdk-17.0.5"
setx PATH "%JAVA_HOME%\bin;%PATH%"
Step 2: Extract SAP Hybris Suite
- Create a root folder for the installation:
C:\Hybris2205SPA- Extract the downloaded SAP Hybris Suite 2205 ZIP file into this folder
Expected structure:
C:\Hybris2205SPA\
├── hybris\
│   ├── bin\
│   ├── config\
│   └── temp\
├── installer\
└── licenses\
Step 3: Set Up Spartacus Sample Data
Create custom directory structure:
-
Navigate to
C:\Hybris2205SPA\hybris\bin\ -
Create a
customfolder:
C:\Hybris2205SPA\hybris\bin\custom- Inside
custom, create aspartacussampledatafolder:
C:\Hybris2205SPA\hybris\bin\custom\spartacussampledata- Extract
spartacussampledata.2105.zipinto thespartacussampledatafolder
Expected structure:
C:\Hybris2205SPA\hybris\bin\custom\spartacussampledata\
├── resources\
├── src\
├── extensioninfo.xml
└── build.xml
Step 4: Configure Custom Properties
Move the custom properties file to the installer configuration directory.
Source:
C:\Hybris2205SPA\hybris\bin\custom\spartacussampledata\resources\installer\Destination:
C:\Hybris2205SPA\installer\customconfig\Action:
Copy all property files from the source to the destination folder.
Step 5: Install Custom Recipe
- Navigate to:
C:\Hybris2205SPA\installer\recipes\- Extract the downloaded
cx-for-sparecipe into this folder
Expected structure:
C:\Hybris2205SPA\installer\recipes\cx-for-spa\
├── build.gradle
└── [other recipe files]
Step 6: Install and Initialize SAP Commerce
Install the platform:
-
Open Command Prompt as Administrator
-
Navigate to the installer directory:
cd C:\Hybris2205SPA\installer- Run the installation command:
install.bat -r cx-for-spaExpected duration: 5-10 minutes
Initialize the system:
After installation completes, initialize the platform:
install.bat -r cx-for-spa initializeExpected duration: 10-20 minutes
What happens during initialization:
- Database creation and schema setup
- Sample data import
- Extension initialization
- Index creation
Step 7: Start SAP Commerce Server
- Navigate to the platform directory:
cd C:\Hybris2205SPA\hybris\bin\platform- Start the server:
hybrisserver.batServer startup indicators:
INFO: Server startup in xxxxx millisecondsVerify server is running:
- Open browser and navigate to:
https://localhost:9002 - You should see the SAP Commerce Cloud welcome page
Important: Keep this Command Prompt window open. The server runs in this terminal.
Part 2: Node.js and Angular Setup
Step 8: Install Node.js
-
Download Node.js v14.20.0 installer (
node-v14.20.0-x64.msi) -
Run the installer and follow the installation wizard
-
Accept the license agreement and default installation options
Verify Installation:
node -v
# Expected output: v14.20.0

npm -v
# Expected output: 6.x.x
Step 9: Prepare Spartacus Storefront Directory
- Navigate to the custom folder:
cd C:\Hybris2205SPA\hybris\bin\custom- Create a folder for your Spartacus storefront:
mkdir spartacusstore
cd spartacusstore
Full path:
C:\Hybris2205SPA\hybris\bin\custom\spartacusstoreStep 10: Install Global Dependencies
Install Yarn package manager:
npm install --global yarnVerify Yarn installation:
yarn --version
# Expected output: 1.x.x
Clean previous Angular CLI installations:
# Uninstall any existing Angular CLI
npm uninstall -g @angular/cli

# Clear npm cache
npm cache clean --force
Install Angular CLI version 12:
npm install -g @angular/cli@12Verify Angular CLI installation:
ng version
# Expected output: Angular CLI: 12.x.x
Step 11: Create Angular Application
Create a new Angular application with Spartacus-compatible settings.
# Ensure you're in the spartacusstore directory
cd C:\Hybris2205SPA\hybris\bin\custom\spartacusstore

# Create new Angular app
ng new mystore --style=scss
Configuration prompts:
- Would you like to add Angular routing? → Yes (press
y) - Which stylesheet format would you like to use? → SCSS (already specified in command)
Expected duration: 2-3 minutes
Step 12: Prepare Application for Spartacus
- Navigate into your application:
cd mystore- Clear the default Angular template:
File: src\app\app.component.html
Open this file and remove all content (delete everything). Save the empty file.
Why this is needed: Spartacus will provide its own component structure, so the default Angular template must be removed.
Step 13: Add Spartacus Schematics
Install and configure Spartacus using Angular schematics.
ng add @spartacus/schematics --ssr --pwa --base-url https://localhost:9002/ --base-site apparel-uk-spa --interactive=falseCommand flags explained:
| Flag | Description |
|---|---|
--ssr | Enable Server-Side Rendering for better SEO |
--pwa | Enable Progressive Web App features |
--base-url | SAP Commerce Cloud backend URL |
--base-site | Base site identifier from CMS |
--interactive=false | Skip interactive prompts, use default configurations |
Expected duration: 3-5 minutes
What gets installed:
- All
@spartacus/*packages - Required dependencies (Angular Material, ngrx, etc.)
- Spartacus configuration modules
- Styles and assets
Step 14: Start Spartacus Development Server
Start the Angular development server with SSL enabled.
yarn start --sslAlternative command:
ng serve --sslServer startup output:
✔ Browser application bundle generation complete.
** Angular Live Development Server is listening on localhost:4200 **
✔ Compiled successfully.
Access your storefront:
- HTTPS:
https://localhost:4200
Important: Keep this terminal window open. The development server runs here.
Part 3: System Configuration
Step 15: Configure Hosts File
Configure Windows hosts file to enable local domain access for multiple storefronts.
File location:
C:\Windows\System32\drivers\etc\hostsImportant: You need Administrator privileges to edit this file.
Instructions:
- Right-click on Notepad and select “Run as administrator”
- Open the hosts file:
File → Open → C:\Windows\System32\drivers\etc\hosts - Add the following lines at the end of the file:
127.0.0.1   localhost
127.0.0.1   electronics.local
127.0.0.1   apparel-uk.local
127.0.0.1   apparel-de.local
127.0.0.1 powertools.local- Save the file (Ctrl + S)
What this does: Maps local domain names to localhost, allowing you to access different storefronts using friendly URLs.
Step 16: Enable Chrome Localhost SSL
Since we’re using self-signed SSL certificates in development, Chrome needs to be configured to allow insecure localhost connections.
Instructions:
-
Open Google Chrome
-
Navigate to:
chrome://flags/#allow-insecure-localhost-
Find the setting: “Allow invalid certificates for resources loaded from localhost”
-
Change the dropdown to: Enabled
-
Click “Relaunch” button to restart Chrome
Why this is needed: Development servers use self-signed SSL certificates that browsers normally block. This setting allows Chrome to accept these certificates for localhost only.
Step 17: Configure OAuth and CORS
Configure OAuth client details and CORS settings to enable secure communication between the Spartacus storefront and SAP Commerce backend.
Access HAC (Hybris Administration Console):
-
Open browser and navigate to:
https://localhost:9002/hac -
Login with default credentials:
- Username:
admin - Password:
nimda
- Username:
Import OAuth and CORS configuration:
- In HAC, click on the Console tab
- Hover over Console and select ImpEx Import
- Paste the following ImpEx script:
INSERT_UPDATE OAuthClientDetails;clientId[unique=true];resourceIds;scope;authorizedGrantTypes;authorities;clientSecret;registeredRedirectUri
;client-side;hybris;basic;implicit,client_credentials;ROLE_CLIENT;secret;http://localhost:9001/authorizationserver/oauth2_implicit_callback;
;mobile_android;hybris;basic;authorization_code,refresh_token,password,client_credentials;ROLE_CLIENT;secret;http://localhost:9001/authorizationserver/oauth2_callback;

INSERT_UPDATE CorsConfigurationProperty;key[unique=true];value;context[default=commercewebservices,unique=true]
;allowedOrigins;http://localhost:4200 https://localhost:4200
;allowedOriginPatterns;*
;allowedMethods;GET HEAD OPTIONS PATCH PUT POST DELETE
;allowedHeaders;origin content-type accept authorization cache-control x-anonymous-consents x-profile-tag-debug x-consent-reference occ-personalization-id occ-personalization-time
;allowCredentials;true
;exposedHeaders;x-anonymous-consents occ-personalization-id occ-personalization-time- Click Import content button
Success message:
Import finished successfullyConfiguration explained:
OAuth Clients:
client-side: Used for implicit grant flow (frontend applications)mobile_android: Used for authorization code and password flows
CORS Settings:
allowedOrigins: Permits requests from localhost:4200 (Spartacus)allowedMethods: HTTP methods allowed for cross-origin requestsallowedHeaders: Request headers permitted in CORS requestsallowCredentials: Enables cookie transmission in CORS requests
Application URLs Reference
SAP Commerce Cloud URLs
| Application | URL | Purpose |
|---|---|---|
| HAC | https://localhost:9002/hac/ | Administration Console |
| Backoffice | https://localhost:9002/backoffice/login.zul | Product and content management |
| SmartEdit | https://localhost:9002/smartedit/ | Content editing interface |
Default credentials for all:
- Username:
admin - Password:
nimda
Hybris Accelerator Storefronts
| Storefront | URL |
|---|---|
| Apparel UK | https://apparel-uk.local:9002/yacceleratorstorefront/en/ |
| Electronics | https://electronics.local:9002/yacceleratorstorefront/electronics/en/ |
| Powertools (B2B) | https://powertools.local:9002/yb2bacceleratorstorefront/powertools/en/USD/ |
Spartacus Storefront
| Application | URL |
|---|---|
| Spartacus (Apparel UK) | https://localhost:4200 |
Verification
Verify Successful Installation
1. Spartacus Storefront:
Navigate to https://localhost:4200 and verify:
- Page loads without errors
- Products are displayed
- Navigation menu works
- Search functionality is available

2. Hybris Apparel UK Storefront:
Navigate to https://apparel-uk.local:9002/yacceleratorstorefront/en/ and verify:
- Classic Hybris storefront loads
- Products are visible
- Can add items to cart

3. Hybris Electronics Storefront:
Navigate to https://electronics.local:9002/yacceleratorstorefront/electronics/en/ and verify:
- Electronics site loads
- Product categories are accessible

Troubleshooting Guide
Issue 1: Spartacus Storefront Not Loading
Symptoms:
- Spartacus displays blank page or loading spinner indefinitely
- Browser console shows currency-related errors
- Products don’t appear
Root Cause:
Currency mismatch between base site configuration and default currency.
Solution:
-
Access Backoffice:
- Navigate to:
https://localhost:9002/backoffice/login.zul - Login with credentials (admin/nimda)
- Navigate to:
-
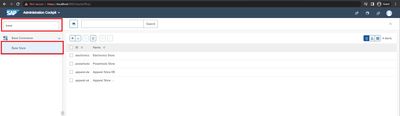
Find Base Store Configuration:
- In the left navigation panel, type “base” in the search box
- Select “Base Store” from the results
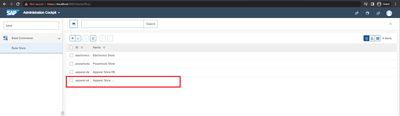
- Open Your Store:
- Locate “apparel-uk” in the list
- Double-click to open the configuration
- Update Default Currency:
- Find the “Default Currency” field
- Change from “Pound [GBP]” to “US Dollar [USD]”
- Click Save button

- Verify Fix:
- Navigate to
https://localhost:4200 - Page should now load correctly with products
- Navigate to
Issue 2: SmartEdit Login Failure
Symptoms:
- Cannot login to SmartEdit (
https://localhost:9002/smartedit/) - “Bad credentials” error message
- Admin password not working
Root Cause:
Admin user password expired or OAuth client not configured for SmartEdit.
Solution:
Part A: Reset Admin Password
-
Access Backoffice:
- Navigate to:
https://localhost:9002/backoffice/login.zul - Login with current credentials
- Navigate to:
-
Find Employee Section:
- In the left navigation, type “employee”
- Click on “Employee” in the results
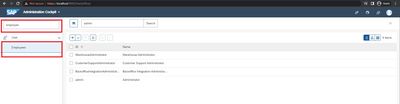
- Open Admin User:
- Search for “admin” in the employee list
- Click on the admin user to open details

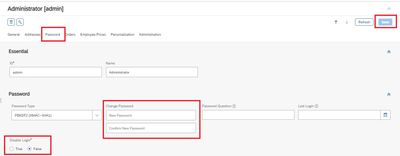
- Update Password:
- Navigate to the “Password” tab
- Enter a new password (e.g.,
admin123) - Set “Disable Login” to False (if not already)
- Click Save
Part B: Configure SmartEdit OAuth Client
-
Access HAC:
- Navigate to:
https://localhost:9002/hac - Login with admin credentials
- Navigate to:
-
Import SmartEdit OAuth Configuration:
- Go to: Console → ImpEx Import
- Paste the following ImpEx:
INSERT_UPDATE OAuthClientDetails;clientId[unique=true];resourceIds;scope[mode=append];authorizedGrantTypes;accessTokenValiditySeconds
;smartedit;hybris;basic,permissionswebservices,previewwebservices;password;3600-
Click Import content
-
Test Login:
- Navigate to:
https://localhost:9002/smartedit/ - Login with username:
adminand your new password
- Navigate to:
Issue 3: Java Version Conflicts
Symptoms:
- Hybris server fails to start
- Error: “Unsupported class file major version”
- Multiple Java versions installed on system
Solution:
Set the correct Java version for the current session:
# Set JAVA_HOME to JDK 17 installation path
set JAVA_HOME=C:\Program Files\Java\jdk-17.0.5

# Update PATH to use this Java version
set PATH=%JAVA_HOME%\bin;%PATH%

# Verify correct version is active
java -version
# Should show: java version "17.0.x"
For permanent configuration:
- Open System Properties (Win + Pause/Break)
- Click Advanced system settings
- Click Environment Variables
- Under System Variables:
- Find JAVA_HOME → Edit → Set to
C:\Program Files\Java\jdk-17.0.5 - Find Path → Edit → Move
%JAVA_HOME%\binto the top
- Find JAVA_HOME → Edit → Set to
Issue 4: Port Already in Use
Symptoms:
- Server fails to start with “Address already in use” error
- Cannot start Hybris on port 9002
- Cannot start Spartacus on port 4200
Solution:
Check what’s using the port:
# Check port 9002
netstat -ano | findstr :9002

# Check port 4200
netstat -ano | findstr :4200
Kill the process:
- Note the PID (Process ID) from the netstat output
- Kill the process:
taskkill /PID <PID_NUMBER> /FAlternative: Change the port in configuration files if the port conflict cannot be resolved.
Issue 5: npm/Yarn Installation Failures
Symptoms:
npm installoryarn installfails- Permission errors
- Network timeout errors
Solutions:
Clear npm cache:
npm cache clean --forceUse alternative registry:
npm config set registry https://registry.npmjs.org/Run with elevated permissions:
Right-click Command Prompt → Run as Administrator, then retry installation.
Increase network timeout:
npm config set fetch-timeout 600000
yarn config set network-timeout 600000
Development Workflow
Daily Startup Routine
Terminal 1 - SAP Commerce Server:
cd C:\Hybris2205SPA\hybris\bin\platform
hybrisserver.bat
Wait for server startup to complete (~2-3 minutes).
Terminal 2 - Spartacus Storefront:
cd C:\Hybris2205SPA\hybris\bin\custom\spartacusstore\mystore
yarn start --ssl
Wait for compilation (~30-60 seconds).
Access Applications:
- Spartacus:
https://localhost:4200 - HAC:
https://localhost:9002/hac - Backoffice:
https://localhost:9002/backoffice
Making Changes
Backend changes (SAP Commerce):
- Modify extensions in
hybris/bin/custom/ - Run
ant clean allto rebuild - Restart Hybris server
Frontend changes (Spartacus):
- Edit files in
mystore/src/ - Changes auto-reload in browser (Hot Module Replacement)
- No server restart needed
Next Steps
Customize Your Storefront
-
Add custom components:
- Create Angular components in
src/app/ - Follow Spartacus component architecture
- Create Angular components in
-
Override Spartacus styles:
- Modify
src/styles.scss - Use CSS variables for theme customization
- Modify
-
Configure additional features:
- Enable user registration
- Set up payment integrations
- Configure checkout flow
Explore SAP Commerce Features
-
Product Management:
- Create products in Backoffice
- Organize categories and catalogs
- Set up pricing and promotions
-
Content Management:
- Use SmartEdit for page editing
- Create CMS components
- Design landing pages
-
Order Management:
- Process orders in Backoffice
- Configure fulfillment workflows
- Set up order notifications
Additional Resources
Official Documentation
- SAP Commerce Cloud Documentation: help.sap.com/commerce
- Spartacus Documentation: sap.github.io/spartacus-docs
- Spartacus GitHub: github.com/SAP/spartacus
Community Resources
- SAP Community: community.sap.com
- Spartacus Slack: Join for community support
- Stack Overflow: Tag:
spartacus-storefront
Related Guides
Version Information
| Component | Version | Notes |
|---|---|---|
| SAP Commerce Cloud (Hybris) | 2205 | Base platform |
| Spartacus Sample Data | 2105 | Compatible with Hybris 2205 |
| JDK | 17 | Required for Hybris 2205 |
| Node.js | 14.20.0 | LTS version for Angular 12 |
| Angular CLI | 12.x | Compatible with Spartacus |
| Spartacus | 4.x | Installed via schematics |
Conclusion
You now have a fully functional SAP Commerce Cloud (Hybris) 2205 installation with Spartacus Angular storefront. This setup provides a modern, headless commerce platform with:
- Multiple sample storefronts for testing
- Full administration capabilities via Backoffice and HAC
- Content editing with SmartEdit
- Modern frontend with Spartacus
Use this environment to develop custom e-commerce solutions, test integrations, and learn SAP Commerce Cloud development.
For production deployments, review SAP’s official deployment guidelines, security best practices, and scalability recommendations.