Introduction
SAP Spartacus (Composable Storefront) is an Angular-based JavaScript storefront for SAP Commerce Cloud. This comprehensive guide walks you through installing SAP Spartacus 2211.42.x locally on Windows 11 using Git Bash and Verdaccio as a local NPM registry.
Table of Contents
What You’ll Learn
By following this tutorial, you will:
- Set up a complete local development environment for SAP Spartacus
- Install and configure Verdaccio as a private NPM registry
- Build Spartacus libraries from source
- Create your first Spartacus storefront application
- Connect to SAP Commerce Cloud OCC backend
- Resolve common installation errors
Estimated completion time: 30-45 minutes
Prerequisites
Before starting, ensure you have the following installed on your Windows 11 machine:
Required Software
Git Bash - Command-line interface for Git on Windows
- Download from: git-scm.com
- Used for running all installation commands
Text Editor - For editing configuration files
- Recommended: Visual Studio Code, Sublime Text, or Notepad++
System Requirements
- Windows 11 (64-bit)
- Administrator access (required for enabling long path support)
- Minimum 8GB RAM (16GB recommended)
- 5GB free disk space
Required Tools & Dependencies
1. Node.js
Node.js is the JavaScript runtime required for Angular and Spartacus development.
Version Requirements:
- Minimum: 22.14.0
- Recommended: Latest 22.x version
Installation using Chocolatey:
choco install -y nodejs-ltsAlternative Installation:
Download the installer from nodejs.org and follow the installation wizard.
Verify Installation:
node -v
# Expected output: v22.x.x
2. npm
npm (Node Package Manager) comes bundled with Node.js and manages JavaScript packages.
Version Requirements:
- Minimum: 8.0.0
- Recommended: Latest version compatible with Node.js 22.x
Verify Installation:
npm -v
# Expected output: 8.x.x or higher
Update npm (if needed):
npm install -g npm@latest3. Angular CLI
Angular CLI is the command-line interface for creating and managing Angular applications.
Version Requirements:
- Minimum: 19.0.0
- Recommended: Latest 19.x version
Installation:
npm install -g @angular/cliVerify Installation:
ng version
# Expected output: Angular CLI: 19.x.x
4. ts-node
ts-node is a TypeScript execution engine for Node.js, required for running Spartacus build scripts.
Installation:
npm install -g ts-nodeVerify Installation:
ts-node -v
# Expected output: v10.x.x or higher
5. Verdaccio
Verdaccio is a lightweight private NPM proxy registry used for local package management during Spartacus development.
Installation:
npm install -g verdaccioVerify Installation:
verdaccio --version
# Expected output: 5.x.x
Verify All Tools:
Run this command to check all installed versions at once:
echo "Node: $(node -v)" && echo "npm: $(npm -v)" && echo "Angular CLI: $(ng version | grep 'Angular CLI')" && echo "ts-node: $(ts-node -v)" && echo "Verdaccio: $(verdaccio --version)"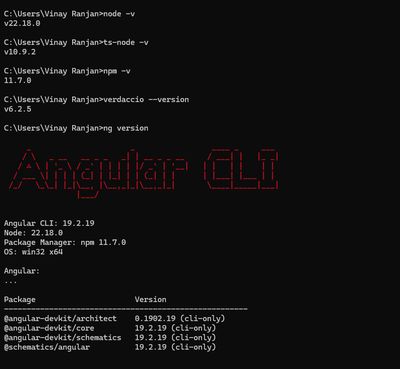
Installation Process
Step 1: Enable Windows Long Path Support
Windows has a default maximum path length of 260 characters. SAP Spartacus has deeply nested dependencies that exceed this limit. You must enable long path support before proceeding.
Instructions:
-
Open PowerShell as Administrator
- Press
Win + X - Select “Windows PowerShell (Admin)” or “Terminal (Admin)”
- Press
-
Run the following command:
New-ItemProperty -Path "HKLM:\SYSTEM\CurrentControlSet\Control\FileSystem" `
  -Name "LongPathsEnabled" `
  -Value 1 `
  -PropertyType DWORD `
-Force- Restart your computer for the changes to take effect
Verification:
After restart, verify the setting in PowerShell (Admin):
Get-ItemProperty -Path "HKLM:\SYSTEM\CurrentControlSet\Control\FileSystem" -Name "LongPathsEnabled"Expected output: LongPathsEnabled : 1
Step 2: Clone Spartacus Repository
Clone the official SAP Spartacus repository from GitHub and check out the specific release branch.
Open Git Bash and execute:
# Navigate to your projects directory
cd /d/Projects/

# Create project folder
mkdir spa2211.42.x
cd spa2211.42.x

# Clone the Spartacus repository
git clone https://github.com/SAP/spartacus

# Navigate into the repository
cd spartacus

# Checkout the specific release branch
git checkout release/2211.42.x

# Verify you're on the correct branch
git branch
# Should show: * release/2211.42.x
Optional: Configure npm to use Git Bash for scripts (recommended):
npm config set script-shell "C:\\Program Files\\Git\\bin\\bash.exe"Step 3: Install Spartacus Dependencies
Install all required Node.js dependencies for the Spartacus libraries.
# Make sure you're in the spartacus directory
cd /d/Projects/spa2211.42.x/spartacus

# Install dependencies
npm install
Expected duration: 3-5 minutes depending on your internet connection
Troubleshooting:
- If you encounter permission errors, ensure you’re not running antivirus software that blocks file operations
- For network issues, try:
npm install --legacy-peer-deps
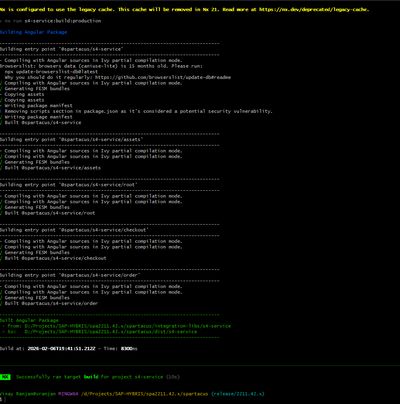
Step 4: Build Spartacus Libraries
Compile all Spartacus libraries from source. This step creates the distributable packages needed for your storefront.
npm run build:libsExpected duration: 5-10 minutes depending on your system specifications
What happens during this step:
- TypeScript compilation for all Spartacus libraries
- Bundling of library modules
- Generation of type definitions
- Creation of distributable packages
Success indicators:
You should see output similar to:
✔ Building entry point '@spartacus/core'
✔ Building entry point '@spartacus/storefrontlib'
✔ Building entry point '@spartacus/assets'
...
Step 5: Start Verdaccio Local Registry
Verdaccio acts as a local NPM registry, allowing you to publish and install Spartacus packages locally without affecting the public npm registry.
Open a NEW Git Bash terminal (keep your existing terminal open) and start Verdaccio:
verdaccioExpected output:
warn --- config file  - /home/user/.config/verdaccio/config.yaml
warn --- http address - http://localhost:4873/ - verdaccio/5.x.x
Important: Keep this terminal window running throughout the entire development process. Do not close it.
Verify Verdaccio is running:
Open your browser and navigate to http://localhost:4873 - you should see the Verdaccio web interface.
Step 6: Configure Verdaccio User
Return to your original Git Bash terminal and add a user account to your local Verdaccio registry.
npm adduser --registry http://localhost:4873/Provide the following credentials when prompted:
- Username:
admin - Password:
nimda - Email:
sap@spartacus.local
Success message:
Logged in as admin on http://localhost:4873/.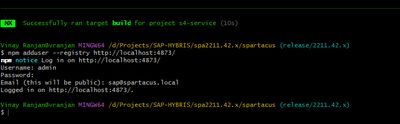
Note: These credentials are for your local registry only and are not used elsewhere.
Step 7: Fix Publishing Script (Critical Step)
The default Spartacus publishing script doesn’t handle prerelease versions correctly. You must modify it before publishing packages.
Problem: Publishing fails with error: "You must specify a tag using --tag when publishing a prerelease version"
Solution:
- Navigate to the Spartacus directory (if not already there):
cd /d/Projects/spa2211.42.x/spartacus-
Open
tools/schematics/testing.tsin your text editor -
Locate the
publishPackagefunction (approximately line 120-140) -
Find this line:
const command = `cd ${directory} && npm publish --registry=${verdaccioRegistryUrl} --no-git-tag-version --color always`;- Replace it with:
const command = `cd ${directory} && npm publish --registry=${verdaccioRegistryUrl} --no-git-tag-version --tag next --color always`;Complete modified function:
function publishPackage(packagePath: string): Promise<PackagePublishingResult> {
    return new Promise((resolve, reject) => {
        const packageJsonContent = JSON.parse(
            fs.readFileSync(packagePath, "utf-8")
        );
        const directory = path.dirname(packagePath);

        // Modified to include --tag next for prerelease versions
        const command = `cd ${directory} && npm publish --registry=${verdaccioRegistryUrl} --no-git-tag-version --tag next --color always`;

        exec(command, {}, (error, stdout, stderr) => {
            if (error) {
                reject({
                    packageName: packageJsonContent.name,
                    stdout,
                    stderr,
                    error: `Command failed: ${error.cmd}`,
                });
            } else {
                resolve({
                    packageName: packageJsonContent.name,
                    stdout,
                    stderr,
                });
            }
        });
    });
}- Save the file
Why this is necessary: The 2211.42.x release branch contains packages with prerelease version identifiers. npm requires an explicit tag when publishing such versions to prevent accidental publication to the default “latest” tag.
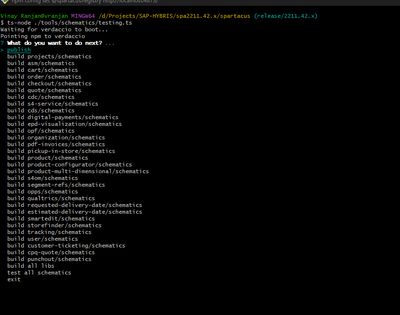
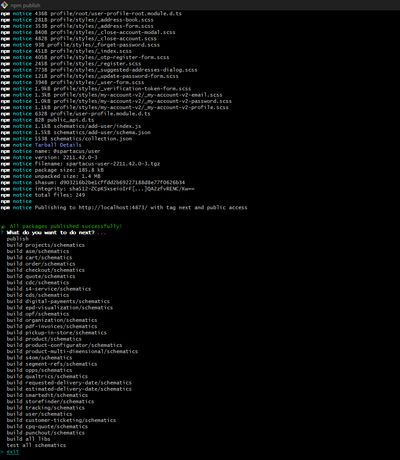
Step 8: Publish Spartacus Libraries to Verdaccio
Publish all compiled Spartacus libraries to your local Verdaccio registry.
# Ensure you're in the spartacus directory
cd /d/Projects/spa2211.42.x/spartacus

# Publish all packages
ts-node ./tools/schematics/testing.ts
What happens:
- All Spartacus packages are published to
http://localhost:4873 - Each package is tagged with
next(due to the modification in Step 7) - Packages become available for local installation
Expected duration: 2-3 minutes
Success indicators:
You’ll see output for each published package:
+ @spartacus/core@2211.42.x-next.0
+ @spartacus/storefrontlib@2211.42.x-next.0
+ @spartacus/assets@2211.42.x-next.0
...
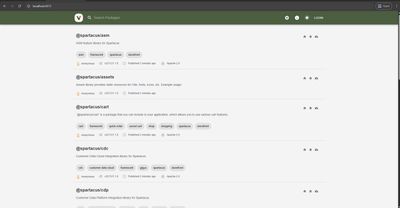
Verify publication:
Open http://localhost:4873 in your browser and confirm all @spartacus packages are listed.
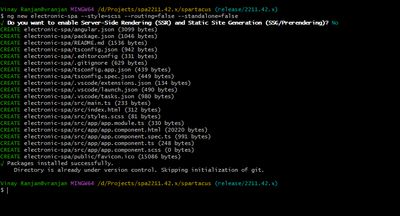
Step 9: Create Spartacus Storefront Project
Create a new Angular application that will serve as your Spartacus storefront.
# Navigate to the parent directory
cd /d/Projects/spa2211.42.x/

# Create a new Angular project with Spartacus-compatible settings
ng new electronic-spa --style=scss --routing=false --standalone=false

# Navigate into the project
cd electronic-spa
Configuration options explained:
| Flag | Value | Reason |
|---|---|---|
--style | scss | Spartacus requires SCSS for styling |
--routing | false | Spartacus provides its own routing configuration |
--standalone | false | Spartacus requires NgModule architecture (not standalone components) |
Important: The --standalone=false flag is critical. Since Angular 17, the default behavior creates standalone applications without app.module.ts. Spartacus requires the traditional NgModule structure.
Expected duration: 1-2 minutes
Step 10: Configure Local Registry for Project
Point your new project to use Verdaccio for Spartacus packages while using the public npm registry for all other packages.
# Ensure you're in the project directory
cd /d/Projects/spa2211.42.x/electronic-spa

# Configure scoped registry for @spartacus packages
npm set @spartacus:registry http://localhost:4873 --location project
Verify configuration:
cat .npmrc
# Expected output: @spartacus:registry=http://localhost:4873
What this does: All packages under the @spartacus scope will be installed from your local Verdaccio registry, while other packages come from the public npm registry.
Step 11: Install Spartacus Schematics
Spartacus schematics automatically configure your Angular application with all necessary dependencies and configuration.
ng add @spartacus/schematics@nextImportant: Use the @next tag because you published packages with the next tag in Step 8.
Interactive prompts:
The schematic will ask several questions:
-
Which Spartacus features would you like to set up?
- Use arrow keys and space to select features
- Recommended for beginners: User Account, Product, Checkout, Cart
-
What base site(s) would you like to use?
- Default:
electronics-spa - Press Enter to accept
- Default:
-
What base URL would you like to use?
- You’ll configure this later in Step 13
- Press Enter to accept default for now
-
Do you want to use server-side rendering (SSR)?
- For local development: No (press
n)
- For local development: No (press
Expected duration: 3-5 minutes
What gets installed:
- All
@spartacus/*packages - Required peer dependencies
- Configuration modules
- Styles and assets
- Routing setup

Step 12: Apply Styling Fixes
Due to import path variations, you may need to adjust SCSS import statements to prevent compilation errors.
If you encounter build errors related to styles:
Fix 1: Update src/styles-config.scss
Replace:
$styleVersion: 2211.42;With:
@import "@spartacus/styles/scss/theme";

$styleVersion: 2211.42;
Fix 2: Update import paths in src/styles/spartacus/ files
Find all files in src/styles/spartacus/ and replace:
@import "..\..\styles-config";With:
@import "../../styles-config";Why this is needed: Inconsistent quote styles and path separators can cause SCSS compilation issues on Windows systems.
Step 13: Configure OCC Backend Connection
Configure your Spartacus storefront to connect to an SAP Commerce Cloud backend.
File to modify: src/app/spartacus/spartacus-configuration.module.ts
Update the configuration:
import { NgModule } from "@angular/core";
import { provideConfig } from "@spartacus/core";

@NgModule({
    providers: [
        provideConfig({
            backend: {
                occ: {
                    baseUrl:
                        "https://composable-storefront-demo.eastus.cloudapp.azure.com:8443",
                    prefix: "/occ/v2/",
                },
            },
            context: {
                baseSite: ["electronics-spa"],
            },
        }),
    ],
})
export class SpartacusConfigurationModule {}
Configuration properties explained:
baseUrl: Full URL to your SAP Commerce Cloud backend (including protocol and port)prefix: OCC API endpoint prefix (typically/occ/v2/)baseSite: Base site identifier from SAP Commerce Cloud CMS configuration
Replace with your values:
- Update
baseUrlwith your actual SAP Commerce Cloud server URL - Update
baseSitewith your configured base site name (e.g.,electronics-spa,apparel-uk-spa)
For local SAP Commerce Cloud instances:
baseUrl: 'http://localhost:9002',
prefix: '/occ/v2/',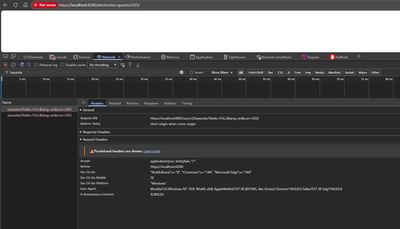
Step 14: Start Development Server
Launch the Angular development server to run your Spartacus storefront.
Option 1: Standard HTTP
npm startOption 2: With HTTPS (Recommended)
ng serve --ssl trueAccess your storefront:
- HTTP: http://localhost:4200
- HTTPS: https://localhost:4200
Expected behavior:
- Initial compilation takes 30-60 seconds
- Browser opens automatically (if configured)
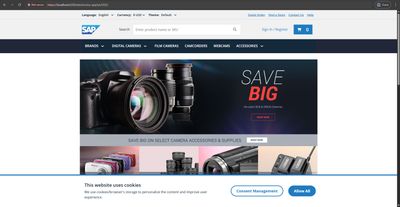
- Storefront displays SAP Commerce Cloud products
First-time compilation output:
✔ Browser application bundle generation complete.
✔ Browser application bundle generation complete.

Initial Chunk Files   | Names         | Size
main.js               | main          | 3.45 MB
polyfills.js          | polyfills     | 339.08 kB
styles.css            | styles        | 156.77 kB

                      | Initial Total | 3.95 MB

Build at: 2026-02-07T10:30:45.123Z - Hash: a1b2c3d4e5f6 - Time: 45678ms

** Angular Live Development Server is listening on localhost:4200, open your browser on http://localhost:4200/ **

✔ Compiled successfully.
Post-Installation Configuration
Development Best Practices
1. Keep Verdaccio Running
Always keep the Verdaccio terminal window open while developing:
- Verdaccio must be running for npm to resolve
@spartacus/*packages - If closed accidentally, restart with
verdacciocommand
2. Port Management
Default ports used in this setup:
| Service | Port | Purpose |
|---|---|---|
| Verdaccio | 4873 | Local NPM registry |
| Angular Dev Server | 4200 | Storefront application |
| SAP Commerce Cloud | 9002/8443 | OCC backend API |
Ensure these ports are not blocked by firewall or used by other applications.
3. Backend Connectivity
Before testing your storefront:
- Verify SAP Commerce Cloud backend is running
- Test OCC API accessibility:
http://your-backend:port/occ/v2/electronics-spa/products - Check CORS configuration on backend to allow frontend origin
Troubleshooting Guide
Issue 1: npm Packages Not Found
Symptoms:
npm ERR! 404 Not Found - GET http://localhost:4873/@spartacus/coreSolutions:
- Verify Verdaccio is running:
# Open http://localhost:4873 in browser
# Should show Verdaccio interface- Check registry configuration:
npm config get @spartacus:registry
# Expected: http://localhost:4873- Verify packages are published:
npm search @spartacus --registry http://localhost:4873- Re-publish if needed:
cd /d/Projects/spa2211.42.x/spartacus
ts-node ./tools/schematics/testing.ts
Issue 2: Build Errors After Installation
Symptoms:
Error: Cannot find module '@angular/core'
Error: Module not found: Error: Can't resolve '@spartacus/core'
Solutions:
- Clear npm cache and reinstall:
cd /d/Projects/spa2211.42.x/electronic-spa
rm -rf node_modules package-lock.json
npm cache clean --force
npm install- Verify Angular CLI version:
ng version
# Should be 19.x.x- Check for peer dependency warnings:
npm list
# Look for UNMET DEPENDENCY warnings
Issue 3: SCSS Compilation Errors
Symptoms:
Error: Can't find stylesheet to import.
Module build failed: SassError: Can't find stylesheet
Solutions:
-
Apply styling fixes from Step 12
-
Verify styles-config.scss imports:
@import "@spartacus/styles/scss/theme";
$styleVersion: 2211.42;- Check import quotes consistency:
// Use single quotes consistently
@import "../../styles-config";- Clear Angular cache:
rm -rf .angular/cache
ng serve
Issue 4: Cannot Connect to Backend
Symptoms:
- Storefront loads but shows no products
- Browser console shows CORS errors
- API calls return 404 or 500 errors
Solutions:
-
Verify backend URL configuration in
spartacus-configuration.module.ts -
Test backend connectivity:
curl https://your-backend-url:8443/occ/v2/electronics-spa/products- Check SAP Commerce Cloud CORS configuration:
# In local.properties or project.properties
corsfilter.commercewebservices.allowedOrigins=http://localhost:4200 https://localhost:4200
corsfilter.commercewebservices.allowedMethods=GET POST PUT DELETE OPTIONS
corsfilter.commercewebservices.allowedHeaders=*- Verify base site is initialized in SAP Commerce Cloud
Issue 5: Long Path Errors (Windows)
Symptoms:
Error: EPERM: operation not permitted
Error: ENOENT: no such file or directory, scandir 'C:\...\node_modules\...'
Solutions:
- Verify long path support is enabled:
Get-ItemProperty -Path "HKLM:\SYSTEM\CurrentControlSet\Control\FileSystem" -Name "LongPathsEnabled"
# Should return: LongPathsEnabled : 1- If not enabled, run as Administrator:
New-ItemProperty -Path "HKLM:\SYSTEM\CurrentControlSet\Control\FileSystem" -Name "LongPathsEnabled" -Value 1 -PropertyType DWORD -Force-
Restart computer (required for changes to take effect)
-
Use shorter project paths:
# Instead of: C:\Users\YourName\Documents\Projects\SAP\Commerce\Spartacus\spa2211.42.x
# Use: D:\Projects\spa2211.42.x
Issue 6: Prerelease Version Publishing Error
Symptoms:
npm error You must specify a tag using --tag when publishing a prerelease version.Solution:
This issue should be prevented by Step 7. If you still encounter it:
-
Verify you modified
tools/schematics/testing.tscorrectly -
Check the modification includes
--tag next:
const command = `cd ${directory} && npm publish --registry=${verdaccioRegistryUrl} --no-git-tag-version --tag next --color always`;- When installing schematics, use:
ng add @spartacus/schematics@nextIssue 7: Node.js or npm Version Mismatch
Symptoms:
Error: The engine "node" is incompatible with this module
Error: This version of CLI requires Node.js version 22.x
Solutions:
- Check installed versions:
node -v  # Should be v22.x.x
npm -v # Should be 8.x or higher- Update Node.js using Chocolatey:
choco upgrade nodejs-lts -y-
Alternatively, download from nodejs.org
-
After updating, verify:
node -v
npm -v
Version Compatibility Matrix
| Component | Minimum Version | Recommended Version | Notes |
|---|---|---|---|
| Windows | 11 | 11 (latest updates) | Windows 10 may work but not tested |
| Node.js | 22.14.0 | 22.x (latest) | Use LTS version |
| npm | 8.0.0 | 10.x (latest) | Comes with Node.js |
| Angular CLI | 19.0.0 | 19.x (latest) | Must match Spartacus requirements |
| Git Bash | 2.30.0 | Latest | Bundled with Git for Windows |
| Verdaccio | 5.0.0 | 5.x (latest) | For local package registry |
| ts-node | 10.0.0 | Latest | For running TypeScript scripts |
Next Steps
Explore Spartacus Features
- Configure additional features:
ng add @spartacus/schematics@next --feature=organization
ng add @spartacus/schematics@next --feature=product-configurator- Enable server-side rendering (SSR):
ng add @spartacus/schematics@next --ssr- Add custom styling:
- Override Spartacus styles in
src/styles.scss - Create custom themes in
src/styles/directory
Development Workflow
- Daily startup routine:
# Terminal 1: Start Verdaccio
verdaccio

# Terminal 2: Start development server
cd /d/Projects/spa2211.42.x/electronic-spa
npm start- Making changes:
- Edit components in
src/app/ - Modify styles in
src/styles/ - Configure features in
spartacus-configuration.module.ts - Changes auto-reload in browser
- Testing:
# Run unit tests
npm test

# Run e2e tests
npm run e2e
Production Build
When ready to deploy:
# Build for production
npm run build:ssr

# Output location
# dist/electronic-spa/
Additional Resources
Official Documentation
- Spartacus Documentation: sap.github.io/spartacus-docs
- Spartacus GitHub Repository: github.com/SAP/spartacus
- SAP Commerce Cloud Docs: help.sap.com/viewer/product/SAP_COMMERCE_CLOUD
- Angular Documentation: angular.io/docs
Community & Support
- Spartacus Slack: Join the community channel for support
- SAP Community: community.sap.com
- Stack Overflow: Tag questions with
spartacus-storefront
Related Guides
- Spartacus Configuration Guide
- Spartacus Styling Guide
- SAP Commerce Cloud OCC API
- Node Version Manager (NVM) Guide
Conclusion
You now have a fully functional SAP Spartacus storefront running locally on Windows 11. This setup allows you to:
- Develop custom features for your storefront
- Test integrations with SAP Commerce Cloud backend
- Experiment with Spartacus configuration
- Build and deploy production-ready storefronts
Remember to keep Verdaccio running during development, and refer to the troubleshooting section if you encounter any issues.
For production deployments, review SAP’s official deployment guidelines and security best practices.