Component is the basic building block of an angular application. Components of the angular application are made up of three things:
-
Template: This is the HTML that will be rendered in the browser. It defines the user interface of the component. It contains HTML, Directive and data bindings. -
Class: It contains the code which is required by the view template. It can contain properties and methods. Wherepropertiescontain the data for the view template and themethodscontains the logic for the view. It uses typescript to define the class. -
Decorator: It is a function that is used to decorate the class. It is used to add metadata to the class.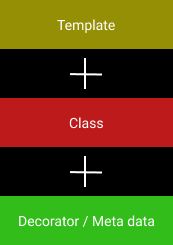
When we create the a new project with the help of Angular CLI these are created by default:
-
app.component.scss- It will be generate if you choose to use SCSS. -
app.component.html- View template. -
app.component.spec.ts- Used for unit testing -
app.component.ts- Contains logic -
app.module.ts- It contains the imports and declarations of the components.
Creating our first app with the help of Angular CLI.
ng new my-appLet’s understand these one by one.
app.component.ts
import { Component } from "@angular/core";

@Component({
    selector: "app-root",
    templateUrl: "./app.component.html",
    styleUrls: ["./app.component.scss"],
})
export class AppComponent {
    title = "my-app";
}
at the bottom we have our class and that class contains a title property. We have our meta-data attached to the class in the form of decorator or we can say it as the component decorator. The component decorator contains the meta-data and the template.
a. selector : It is a custom tag name that will be used to select the component.
b. templateUrl : Path of the template.
c. styleUrls : Path of the stylesheet and it is applicable to one component only.
app.module.ts
import { NgModule } from "@angular/core";
import { BrowserModule } from "@angular/platform-browser";

import { AppRoutingModule } from "./app-routing.module";
import { AppComponent } from "./app.component";

@NgModule({
    declarations: [AppComponent],
    imports: [BrowserModule, AppRoutingModule],
    providers: [],
    bootstrap: [AppComponent],
})
export class AppModule {}
In app module we have imported the AppComponent from the app.component.ts file and added to the declarations array. It contains all the components which is used in the application.
Now let’s create one component where c is the shotcode for component.
ng g c app-testAfter creating the component you will be able to see the changes inside the app.module.ts file.
import { NgModule } from "@angular/core";
import { BrowserModule } from "@angular/platform-browser";

import { AppRoutingModule } from "./app-routing.module";
import { AppComponent } from "./app.component";
import { AppTestComponent } from "./app-test/app-test.component";

@NgModule({
    declarations: [AppComponent, AppTestComponent],
    imports: [BrowserModule, AppRoutingModule],
    providers: [],
    bootstrap: [AppComponent],
})
export class AppModule {}
Now we can check the app-test.component.ts file. Here you can see a newly added class named as AppTestComponent. It is responsible implementing the OnInit interface which has a method , constructor and ngOnInit (lifecycle hook) method. The ngOnInit method is called when the component is initialized.
import { Component, OnInit } from "@angular/core";

@Component({
    selector: "app-app-test",
    templateUrl: "./app-test.component.html",
    styleUrls: ["./app-test.component.scss"],
})
export class AppTestComponent implements OnInit {
    constructor() {}

    ngOnInit(): void {}
}
Understanding the flow of the application
let’s see the index.html file.
<!doctype html>
<html lang="en">
    <head>
        <meta charset="utf-8" />
        <title>MyApp</title>
        <base href="/" />
        <meta name="viewport" content="width=device-width, initial-scale=1" />
        <link rel="icon" type="image/x-icon" href="favicon.ico" />
    </head>
    <body>
        <app-root></app-root>
    </body>
</html><app-root></app-root>The app-root is the selector for the app.component which is the root component of our application.
import { Component } from "@angular/core";

@Component({
    selector: "app-root",
    templateUrl: "./app.component.html",
    styleUrls: ["./app.component.scss"],
})
export class AppComponent {
    title = "my-app";
}-
Now take a look at
app.component.htmlfile which represents the view for theapp.componentwhich is the root component of our application.
-
Start the application by opening the
index.htmlfile in the browser you will be able to see that theapp.componentis rendered in the browser.
-
The app will be running on the port
http://localhost:4200/by default and the output will be :
-
Now we are linking our newly created component to the
app.component.htmlfile.
-
You will be see the output like this

Different ways to make the changes in the component -
import { Component, OnInit } from "@angular/core";

@Component({
    selector: "app-app-test",
    templateUrl: "./app-test.component.html",
    styleUrls: ["./app-test.component.scss"],
})
export class AppTestComponent implements OnInit {
    constructor() {}

    ngOnInit(): void {}
}
There are three ways to make the changes in the selector :
- We specify the selector and use it as a custom HTML tag.
@Component({
  selector: 'app-app-test',
  templateUrl: './app-test.component.html',
  styleUrls: ['./app-test.component.scss']
})<app-app-test></app-app-test>- Specify the selector as a class name.
@Component({
  selector: '.app-app-test',
  templateUrl: './app-test.component.html',
  styleUrls: ['./app-test.component.scss']
})<div class="app-app-test">...</div>- Enclose the selector in square brackets and inside our HTML we specify it as an attribute.
@Component({
  selector: '[app-app-test]',
  templateUrl: './app-test.component.html',
  styleUrls: ['./app-test.component.scss']
})<div app-app-test>...</div>Ways to make the changes in the template :
- We can use the
templateUrlto specify the location of the template file and the template file will be loaded into the component.
@Component({
  selector: 'app-app-test',
  templateUrl: './app-test.component.html',
  styleUrls: ['./app-test.component.scss']
})- We can also use the
templateproperty to specify the template content inside the component.
@Component({
  selector: 'app-app-test',
  template: `<div>Hello World</div>`,
  styleUrls: ['./app-test.component.scss']
})
Ways to make the changes in the styles :
- We can use the
styleUrlsproperty to specify the location of the styles file and the styles file will be loaded into the component.
@Component({
  selector: 'app-app-test',
  templateUrl: './app-test.component.html',
  styleUrls: ['./app-test.component.scss']
})- We can also use the
stylesproperty to specify the styles content inside the component and use it as an inline style.
@Component({
  selector: 'app-app-test',
  templateUrl: './app-test.component.html',
  styles: [`
  div{
    background-color: red;
    color: white;
    padding: 10px;
    border-radius: 5px;
  }
  `]
})
To know more about Angular Components visit angular.io.